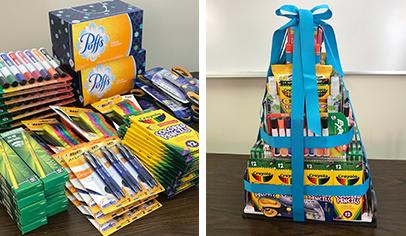


Teachers spend a lot of their own money stocking classroom supplies—upward of $500 a year, according to several recent surveys. Help them out and make a splash at the same time with a four-tier school supply cake!
Our cake weighs in at 32 pounds and has a retail value of more than $500. It’s made with the most commonly requested school supplies on almost 1.5 million classroom supply lists on our sister site, TeacherLists.com. Follow along with our step-by-step instructions, or use them as a guide and customize your cake with what your school’s teachers need most.
General supplies
-
2 pieces of foam core, 12"x18"x0.125"
-
1 piece of thin cardboard, roughly 8.5"x10.25"
-
clear office tape (scotch tape)
-
stronger clear tape (optional; a small amount to use in a few spots)
-
wider cloth ribbon, such as 1.5" width
-
narrower cloth ribbon in the same color, such as 0.875" width
-
scissors
School supplies
(purchase your cake school supplies online in one click from TeacherLists.com)

-
4 packages of filler paper, 100 sheets
-
6 boxes of zip-top bags, gallon-size
-
16 spiral-bound notebooks
-
12 boxes of #2 pencils, 12-count
-
8 boxes of colored pencils, 12-count
-
6 packages of blue ball-point pens, 2-count
-
6 packages of black ball-point pens, 2-count
-
4 pairs of full-size scissors
-
2 large boxes of tissues
-
4 packages of dry-erase markers, 8-count
-
2 packages of thin highlighters, 5-count
-
1 square box of tissues
-
6 to-go packages of premoistened wipes
-
8 boxes of crayons, 24-count
-
4 bottles of hand sanitizer, 2 oz. each
-
3 packs of 3"x3" sticky notes, 5-count
-
10 glue sticks
-
8 pink erasers
Tips
★ While hot glue will hold the items securely, using clear office tape makes it easy to reposition items as needed (and easier for the teachers to disassemble afterward). It’s OK if you make a mistake! Just reposition and keep going.
★ Make sure brand names are right-side-up and visible, especially when you’re attaching several items together in a row; this gives your finished cake a more polished look than having the items placed every which way, and it maximizes the oohs and aahs as the cake gets disassembled.
★ Push soft or light items gently to recenter them as you work, being careful not to crush them.
★ Some items will need to be attached together in rows; when securing them together, place the tape so it will be hidden from view. The ribbon added at the end will also hide a lot of flaws!
Directions
Tier 1 (bottom)

-
Prepare your base by stacking the two pieces of foam core and making sure they’re aligned.
★ Tip: Your base should be slightly larger than your first layer of supplies.
-
Place four packages of 100-sheet filler paper next to each other on your base, stacked two by two.
-
On top of the filler paper, running widthwise across the paper, place three stacks of gallon-size zip-top bags, two boxes in each stack.
★ Tip: Make sure the boxes are centered so that there’s an equal amount of filler paper edge visible around the zip-top bags.
-
Center a stack of spiral-bound notebooks on top of the zip-top bags. To make the notebook stack sit more evenly, turn every second notebook so that the spiral edges alternate sides.
-
Tape together three boxes of pencils, with the front of the box facing out on both sides. Place the pencils along the short edge of the spiral notebooks. Repeat on the opposite side of the spiral notebooks.
Depending on the size of your pencil boxes and the height of your stack of spiral notebooks, you may need to place another taped trio on top of the first ones, also with the front facing out. The pencil boxes should be close to the same height as the spiral notebooks (it’s OK if they’re a little shorter).
-
Roll a short piece of scotch tape, place it on the back of a box of colored pencils, and position the colored pencils on one end of the long side of the zip-top bags. Repeat with three more boxes of colored pencils running along that entire side.
-
Take three packages of ball-point pens, overlap the packages, and tape them together. Then roll a short piece of scotch tape onto the back and attach the pens to the short side of the zip-top bags. (The edge of the filler paper should stick out past the pens.) Position a second set of three packages of pens with tape to cover the rest of this side.
-
Repeat step 6 on the opposite long side.
-
Repeat step 7 on the opposite short side.
-
Centered in front of the colored pencils and covering the edge of the filler paper, attach a pair of scissors sideways with tape. Repeat on the remaining three sides.
★ Tip: To fit two pairs of scissors on each long side, turn them so the handles are on the outer corners, then overlap the points in the center of the side.
Tier 2

-
Place a thin piece of cardboard across the top of the spiral notebooks. It should be placed at a 90-degree angle to the notebooks; this will increase the amount of surface space you have to keep building your cake.
★ Tip: Make sure your cardboard is positioned well so that it can support the items being placed higher.
-
Place two large tissue boxes side by side on top of the thin cardboard; make sure they’re centered evenly on the cardboard and the spiral notebooks. Place a couple of strips of tape across the tops of the tissue boxes to hold them together, then roll a couple of pieces of tape to secure the bottoms to your cardboard.
★ Tip: Try to keep your tissue boxes from getting crushed before building the cake; this will make it easier to continue placing items around and over them.
-
Roll a piece of tape on the back of an eight-pack of dry-erase markers and secure it to a short end of the tissue boxes, caps facing up. (The dry-erase markers should be sitting on the spiral notebooks.) Then secure a pack of thin highlighters sideways to the front of the dry-erase markers.
-
Secure another package of dry-erase markers to a long side of the tissue boxes. (There should be space on the cardboard to place the bottom of the package.)
-
Repeat step 13 on the opposite short side.
-
Repeat step 14 on the opposite long side.
Tier 3

-
Center a square box of tissues on top of the large boxes of tissues and secure with tape.
-
Secure two packs of resealable premoistened wipes vertically, side by side, on the side of the square tissue box along the long side of the cake; secure one pack of wipes vertically on the side of the tissue box along the short side of the cake. Repeat on the opposite sides. If you have more than one color of wipes, alternate them on each side.
-
Secure two packs of crayons vertically, side by side, in front of the wipes on all four sides.
-
Place a small bottle of hand sanitizer in each corner between the crayons and secure with a rolled piece of tape on the bottom.
Tier 4 (Top)

-
Tape together two packages of sticky notes, bottom to bottom so the front label faces out on each end, and secure it to the top of the square tissue box. Then secure another package of sticky notes on top, with the front label facing up.
-
Place five glue sticks in a row and attach them to each other, then place the row of glue sticks on the side of the doubled package of sticky notes (long side of the cake) and secure it with tape. Repeat on the opposite side. The glue sticks should be sitting on the edge of the square tissue box.
★ Tip: Because the glue sticks roll around easily, you may find it easier to use stronger tape when attaching the row of five to each other.
-
Place four small pink erasers in a row and attach them to each other, then place the row of erasers on the side of the single package of sticky notes (short side of the cake) and secure it with tape. Repeat on the opposite side. The erasers should be sitting on the edge of the doubled pack of sticky notes.
★ Tip: The eraser surface is harder to secure, so you may find it easier to use stronger tape when attaching the row of four to each other.
Finishing Touches

-
Using your wider ribbon, tape an end to the bottom tier of the cake and then wrap it once horizontally around the entire bottom tier. Cut, then overlap and tape the end, pulling the ribbon taut so it doesn’t sag.
★ Tip: Get a friend to help you wrap the ribbon!
-
Repeat step 24 around the middle of the cake.
-
Using your narrower ribbon, tape an end to the top tier of the cake and then wrap it once horizontally around the entire top tier (including the glue sticks and erasers). Cut, then overlap and tape the end, pulling the ribbon taut so it doesn’t sag.
-
Using your wider ribbon and a friend to help, slide the ribbon under the foam core base lengthwise and bring the two ends to the top of the cake. Cut, leaving enough length to knot and trail the ends. If you’d like, repeat by adding a second vertical ribbon around the cake widthwise.
-
Take a shorter length of ribbon and tie into a bow around the knot at the top. Trim the trailing ends so that they are neat and even.

Voila! Present your completed supply cake to a lucky teacher at your school!
Originally posted in 2018 and updated regularly